How to install Portainer on a server and launch WordPress stack
Portainer is a GUI container management tool that works effectively with Docker.
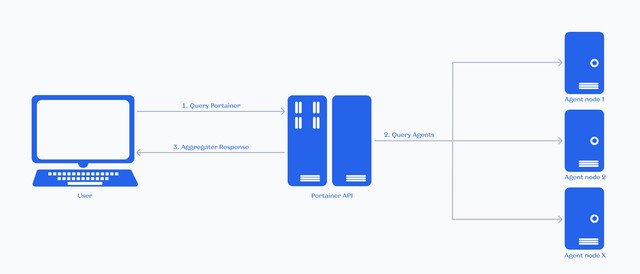
Portainer consists of two components: Portainer Server and Portainer Agent. Both components run as Docker containers, making deployment easy. Portainer operates by placing its agents on all nodes, communicating through HTTP requests. Additionally, Portainer Server and Portainer Agent can run on the same server. In this article, we will focus on this specific setup.

In the table below, you can see the most popular features of Portainer and comparison with alternative applications
| DockStation | Kitematic | Portainer | Shipyard | |
|---|---|---|---|---|
| Working with Docker Compose | + | - | - | - |
| Working with Docker Machine | + | + | + | + |
| Configuring individual containers | - | + | + | + |
| Basic container operations (start, stop, restart, ...) | + | + | + | + |
| Displaying container logs | + | + | + | + |
| Searching through logs | + | - | - | - |
| Grouping and searching containers | + | - | - | - |
| Resource usage monitoring | + | - | + | + |
| Working with remote nodes | + | - | + | - |
| Application templates | - | - | + | - |
| Working with custom hubs | - | - | + | - |
Portainer is available in two versions:
- The free and open Community Edition
- The paid Business Edition, which has additional features for corporate clients. The Business Edition can also be obtained for free for up to three hosts by requesting it on the Portainer website - https://www.portainer.io/take-3
In this article, we will install Portainer on Ubuntu 22.04 and use the Community Edition. I recommend always using the second-to-last release of the operating system for better stability. Most of the steps are similar for other Debian-based operating systems.
Step 1: Installing Portainer in Docker
Before installing Portainer, make sure Docker is installed on your system.
To check if Docker is installed on your system, you can use the following command:
docker --versionThis command will return the version of Docker if it is installed. If Docker is not installed, you'll receive an error message indicating that the command was not found.

If Docker is already installed, you can skip this step. Otherwise, follow these commands to install Docker:
sudo apt install apt-transport-https ca-certificates curl software-properties-commoncurl -fsSL https://download.docker.com/linux/ubuntu/gpg | sudo gpg --dearmor -o /usr/share/keyrings/docker-archive-keyring.gpgecho "deb [arch=$(dpkg --print-architecture) signed-by=/usr/share/keyrings/docker-archive-keyring.gpg] https://download.docker.com/linux/ubuntu $(lsb_release -cs) stable" | sudo tee /etc/apt/sources.list.d/docker.list > /dev/nullsudo apt update
apt-cache policy docker-cesudo apt install docker-ce
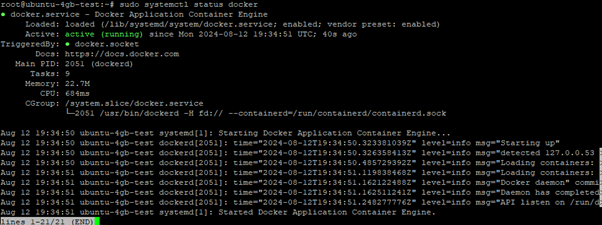
sudo systemctl status docker


Install Docker compose
mkdir -p ~/.docker/cli/curl -SL https://github.com/docker/compose/releases/download/v2.3.3/docker-compose-linux-x86_64 -o ~/.docker/cli/docker-compose
chmod +x ~/.docker/cli/docker-composedocker compose version
Step 2: Creating a Working Directory
Create a directory for the application in /opt and navigate to it:
 cd /opt
sudo mkdir xtomportainer
cd ./ xtomportainer
This commands will set up the necessary directory where you will install and manage your Portainer application.
Step 3: Creating a Configuration File
Now, create a docker-compose.yml file in the xtomportainer directory. This file will describe the configuration needed to run Portainer. Use the nano editor or any other text editor to create the file:
sudo nano /opt/xtomportainer/docker-compose.yml This will open a new file where you can define the necessary configuration for your Portainer setup.
Insert the following content into the docker-compose.yml file:
version: "3.3"

services:
	twportainer:
		image: portainer/portainer-ce:latest
		container_name: xtomportainer
		environment:
			- TZ=Europe/Amsterdam
		volumes:
			- /var/run/docker.sock:/var/run/docker.sock
			- /opt/xtomportainer/portainer_data:/data
		ports:
			- "8000:8000"
			- "9443:9443"
		restart: always
Description of Parameters:
version: "3.3": Specifies the version of Docker Compose you are using. Version 3.3 is suitable for most modern applications.
services: This section describes the services that will be started.
xtomportainer: The name of the service. It is used as an identifier.
image: portainer/portainer-ce:latest: Defines the image that will be used. Here, the latest version of the Community Edition is used.
container_name: xtomportainer: Assigns a name to the container, making it easier to identify.
environment: Allows you to set environment variables. For example,
- TZ=Europe/Amsterdamvolumes:
allows Portainer to interact with Docker on your host machine./var/run/docker.sock:/var/run/docker.sock
creates persistent storage for data./opt/xtomportainer/portainer_data:/data
ports:
open the corresponding ports for accessing Portainer. Port 9443 is used for HTTPS connections."8000:8000"and"9443:9443"
restart: always: Ensures that the container will automatically restart if necessary, such as after a server reboot.
Step 4: Launching Portainer
After creating the configuration file, start Portainer by running the following commands:
cd /opt/ xtomportainerdocker compose up -dStep 5: Accessing the Interface
Portainer is now running and accessible at https://{ip}:9443. Open this address in your web browser to access the web interface.
Replace {ip} with server IP address.
Step 6: Creating an Administrator Account
When you log in for the first time, you will be prompted to register an administrator account. Password must be at least 12 characters long. After completing the registration process, you will get access to the settings and container management features within the interface.
Step 7:Practical Use of Stacks for Deploying WordPress
One of the key features of Stacks is the flexibility in choosing the method for defining the configuration: you can use the built-in editor to directly write or edit Docker Compose files, upload an existing docker-compose.yml file, or even connect a Git repository for automatic updates and container deployments. Now, we go to apply this technology in practice. Using the example of deploying WordPress, we will demonstrate how to use Stacks to create and manage multi-container applications. This example will help you understand how to simplify and automate your application deployment processes using Stacks.
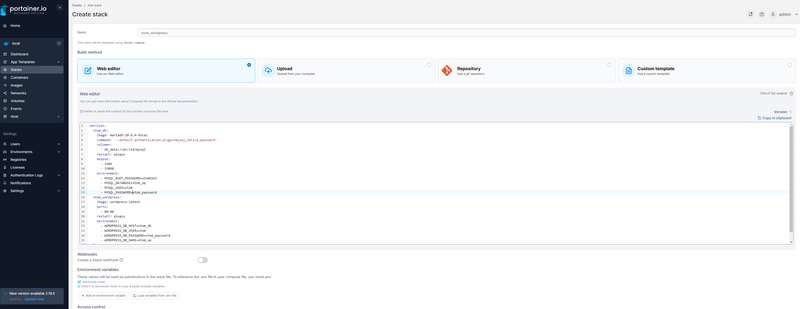
In the "Stacks" tab, click on "Add stack" to open the configurator.
Using the "Web editor," give the stack a name and describe the application configuration in YAML format. For WordPress and a MariaDB database, the configuration might look like this:
services:
	xtom_db:
		image: mariadb:10.6.4-focal
		command: '--default-authentication-plugin=mysql_native_password'
		volumes:
			- db_data:/var/lib/mysql
		restart: always
		expose:
			- 3306
			- 33060
		environment:
			- MYSQL_ROOT_PASSWORD=xtomtest
			- MYSQL_DATABASE=xtom_wp
			- MYSQL_USER=xtom
			- MYSQL_PASSWORD=xtom_password

xtom_wordpress:
	image: wordpress:latest
	ports:
		- 80:80
	restart: always
	environment:
		- WORDPRESS_DB_HOST=xtom_db
		- WORDPRESS_DB_USER=xtom
		- WORDPRESS_DB_PASSWORD=xtom_password
		- WORDPRESS_DB_NAME=xtom_wp

volumes:
	db_data:

Click "Deploy the stack." After a short wait, if the deployment is successful, you will be redirected to the "Stacks list" page, where our WordPress instance will be displayed.
Check the WordPress installation by navigating to http://{ip}:80. You should see the WordPress welcome page, which confirms a successful deployment.
Conclusion
In our review, we covered all the important aspects of working with Portainer, from its installation to the details of deploying applications through Stacks. The example of deploying WordPress clearly demonstrated how Portainer simplifies working with complex systems, making the management process more efficient. This article provided a comprehensive overview of Portainer as a solution for simplifying and optimizing application deployment processes.


